Since the last post a lot of work has been done, although it is not always really obvious from looking. I’ve spent a lot of time on the engine with the builder on the phone, doing a net meeting and having the computer hooked to the EFI system. We spent most of the time working on eliminating a stalling problem and trying to get the engine to start better and run smoothly when cold. The stalling problem appears to be resolved, but the engine still starts poorly. It was oscillating at cold starts – nearly stalling and then revving back up multiple times before leveling out at idle. Now it just starts poorly – if at all – unless I give it gas. That will have to continue to be a focus area.
Other things we did were to run the go-kart on road with the engine at high RPM – 3500-5500 – to monitor and set up the Air/Fuel ratios. Julie and I did this, Julie in the passenger seat holding and reading the EFI info on the laptop. I was driving and trying to hold my hat on. We ran at 70-80 mph – probably not really safe considering the state of the build. But, the good thing is the car handled and drove well, so it was worth it – mostly. Julie said she feared for her life – I thought it was fun!
I also verified the tach was working properly and went through a calibration on the speedometer and odometer to get that reading correctly. Also, after filling the fuel tank I calibrated the fuel gauge. I also purchased a couple of extra calibration wires for the clock and odometer. I drilled some holes in the dash filler panel and permanently mounted these calibration wires since I will need to use them periodically and need easy access. Once the car is finished, to get to the gauges for adjustments I would have to pull them from the front or remove the body – neither good options.
The other big focus was completing the wiring and electrical connections. This has now been completed except for the horn, which comes a bit later. I will have to still do some extensive disconnect and re-connect work through the finishing work on the build. The largest piece of work was getting head, tail, blinker and flasher lights working. This required some extensive wiring and plug building.The lights use waterproof weatherpack connectors.

All of the individual lights – 2 headlight and 2 running/turn lights in front and 2 tail/brake and t running/turn lights in back – had to have terminals and seals on each wire and then the wires inserted into plugs.

I rented a special weatherpack connector pliers for this which was invaluable. Then I had a lot of work to do on the harness wiring. The Ron Francis harness had plug ends for the lights in the front and rear corners. However, there was only one plug for all the lights at each corner. This meant once the car was fully assembled if I ever needed to remove a light or the body, the wiring would be “trapped”. So I had to separate the wiring at each corner into two separate plugs each. In the rear also had to work in a plug for the license plate bracket light. This was not difficult work, but it was very time consuming.

After getting all the wiring done I connected the lights and started testing.

I came up with very mixed results. The headlights worked fine, including the brights and the bright indicator light on the dash. All the “running” lights also worked with the headlights. Past that, I had issues. When I tried the turn signals I got both sides blinking for both left and right signals. The dash indicator light was fine. For the emergency flashers I had followed FFR input but got some odd results. I got all the blinker lights flashing as expected and the blue and green indicator lights, but I also got the headlights flashing. So needless to say, lots of work to do.
I spent a lot of time investigating and figuring out what to do. While doing this, I also noticed some issues with the routing of some wires in the engine compartment. The nylon loom for the alternator wires had fallen and was touching the header so was a it melted. I replaced the melted section and secured the wiring out of the way. I also saw some of the spark plug wiring sagging closer to the headers, so I added some plug wire harnesses to also keep these out of the way.

With this done I was able to proceed with some of my wiring options. FFR had suggested adding a buss flasher to the turn signal circuit. My friend Rocco recommended eliminating the turn signal indicator light ground and wiring the left and right turn signal indicator leads to the two indicator light leads. I chose to try the FFR recommendation first since all options would require significant cutting and re-soldering of wires. First I added terminal ends to the wires I connected to the buss flasher.

Then I cut and connected the wires into the harness and indicator lights and switches as I was told. This did not work at all!. I then took this apart and tried some modified wiring options. This also did not work, but through all this I was learning more how the system was designed and worked. Given this, I made some more changes, and using Rocco’s recco I eliminated the green indicator (turn signal) light ground. When this was done, I got the blinkers to work correctly, but the flashers only blinked on one side, and I got feedback on the indicator lights. Still, I learned more. Based on everything I now had learned, I was able to reach some solid conclusions and made a new plan. I needed at least one diode in the circuit to eliminate feedback, and I wanted to wire differently to the dash indicator lights.
I was able to get Rocco to send me some diodes. I added one into the turn signal indicator circuit, rewired the switch for the flasher and the indicator lights, and tested again.

At long last, success! The turn signals work properly with the green dash indicator light. The bright lights work with the blue dash indicator light. And the flashers work, with only blinking turn signal lights, no blinking headlights, and the red dash indicator light.
While executing this work I also struggled for 3 hours when the headlights on the passenger side quit working correctly. After checking a “thousand” things, I finally found one of the wire pins in the weatherpack plug had backed out. Lots of fun there!
I had also decided to install the battery disconnect switch. I chose to put this in the engine compartment. I fabricated, drilled and painted a mounting bracket.

I drilled and mounted this to the frame and then relocated the battery wire to this location. I cut and soldered new terminals on a short length of wire to connect the switch to the starter solenoid.

Then everything was re-connected. Having this installed simplifies working on the electrical system. I can disconnect the battery whenever I am cutting, soldering or connecting wires. After losing a few fuses earlier, this was a nice feature to have.

After this was done I started on the seat heaters. I added some insulation on the seat bottoms and backs, covered this with felt, and then fit and attached the heater panels.

I wired everything up to make sure it worked, and then cut and soldered wires to fit. I will have to remove and run them correctly once the carpet and pads are installed, but the basics are done.
Lastly, I connected the stereo and tested that with the speakers. This was all ok. I will permanently mount the stereo and finalize the speaker wiring once the interior sheet metal and carpeting are completed.

So, other than the horn installation and connections, the electrical is now done and functional and I can move on the completing the interior and the sheet metal.
More pictures can be found in the Gallery.
Note:Â Added link at bottom to additional photos.
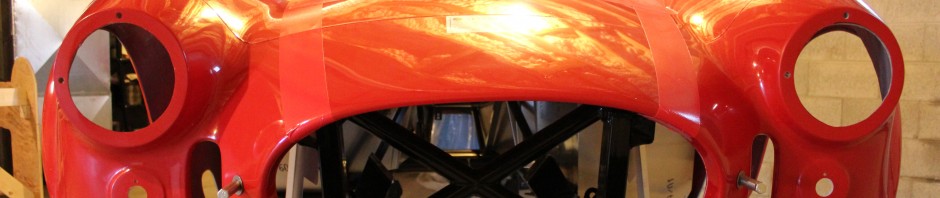
On Dec. 21, 2013, the stripes were painted on the body and the hood and trunk lid, and the final coats of clear were also sprayed on. Later that day the body was returned to me. Unfortunately, there were a couple of flaws found. Because of the bouncing in the transport, there were a few cracks created in the paint in the rear. Also, there were some rough spots near each corner on the underside of the hood. It would be great if they were not there, but none is a showstopper at this time. Dave and I will look at it all again in the future to see what can or should be fixed. 
 With help from some friends the body was put back on the chassis. Now I could start with the final assembly. I put the hood scoop in place and drilled out all the holes needed for fasteners, using increasingly larger bits to get to the correct size.
  Next I installed all of the quick jack bolts, making sure the car was sitting straight and level. I then installed the seats, followed by the doors. Minor adjustments got them to sit well in the door openings. I then started on the trunk and hood. I put on the trunk latch catch and the trunk weatherstrip. I then installed the hood handles and prepped for the hood scoop. This entailed cutting off every bolt to get the length correct to fit with acorn nuts.
  I put on the door latches and made the necessary adjustments to get them to fit and close the doors well. I next installed the trunk lid, trunk handle and latch. Then, I used a template to drill fastener holes for the license plate holder and light. I ran the wiring from the chassis harness through the hole I made in the rear of the trunk lid and fastened them to the license plate light wiring. After this was done, I put on the upholstered cover I had made for the access hole in the trunk lid.
 After this I went back to the and cut and installed the final bolts for the hood scoop. I next spent some time on lights installing the rear brake and tail lights and the front turn signal lights. All of these needed a bit of filing to get them centered well. The I connected the wiring for all of these.
  With help from Pete and Julie I then installed the hood. I had to adjust the height a bit by removing some of the weatherstripping I had put on the hood lip. I also noticed the stripes on the hood were not aligned with the front of the body. I loosened the quick jack bolts, lifted and moved the body a bit to align the stripes, and re-tightened the quick jacks. I also eventually put some pipe insulation around the quick jacks to avoid some good knee and head knockers While closing the driver door, the latch broke, so I had to fix it. Many people do this before they break as this is a known fault, so the fix was well documented but annoying nonetheless. I then secured the bottom of the body to the underside of the chassis. Next I worked on the radiator aluminum. One piece went in the center and a piece on each side. I had to do a decent amount of cutting and filing to get a good fit, and then drilled and riveted or bolted them in place.
 I then put the car on jack stands. I removed the tires for easier access underneath when needed. I then started on the side exhausts. To avoid rubbing and damage on the body underside I put in a piece of heavy rubber under the side bracket. Then I attached the pipes to the J-pipes. The driver side bolted up easily with few adjustments. The passenger side required three shim and a tapered shim, but with minor effort I also got a very good fit on this. On the side brackets I only attached with one bolt as recommended in the forum to reduce risk of breaking the bracket off the side exhaust due to vibration. Finally, I installed the heat shield brackets on the side pipes and then attached the heat shields on the pipes as required by PA DMV.

 Next I worked on the headlights. I knew I had to cut the plug off the light wiring since it would not fit through the headlight bucket. I did this and soldered male and female connectors to the ends. I then put the light in place and found the wires to be too short!! So, I removed the light, cut and added extensions to the wiring, and then they would reach the plug end. Both headlights required a bit of fine tuning to fit properly, but this was done and all the wiring connected. I tested all the lights, and they all worked! I then added the headlight trim rings, tie-wrapped all the wiring out of the way, and the lights were done.

 I next worked on the LeMans fuel filler cap and filler hose. I fastened the fuel cap to the body, including a ground strap to the chassis. I cut the filler hose to length and attached the ends with hose clamps to the bottom of the filler cap and the filler pipe in the fuel tank. The internal plastic cap was then put on the this was complete. I then did a bit of touch up painting on the roll bars. While these dried, I installed the mesh brake duct covers using silicone and tape. The I marked, drilled and installed the door check straps on each door. I also put in the steering wheel center section and placed in the FFR badge. I also decided to put a second touch up coat of paint on the roll bars.
 I then started on the windshield. I installed the side support arms, and decided to pre-fit the sun visor brackets. The screws would not fit, so I checked on the forum. This is a common problem due to the windshield frame being drilled and tapped prior to the chrome plating. So, I had to buy a tap to clean out the holes. Unfortunately, during my second pass through the holes, I caught an edge of the windshield and it cracked! So, I had to order replacement glass. While waiting to get the glass, I went back to the roll bars. I put the grommets on the bars, then fitted them in place and fastened them all the way around. I then drilled the fastener holes for the grommets and installed the screws. For two of the screws I had to make small metal tabs to reach the opening cut in the body. But this worked and all are nicely in place.
 I next screwed back in the trunk access covers. After these were in place I reset the insulation and carpet back in place and the trunk interior was complete. I also marked, drilled and fastened the rear view mirror on the body above the dash.
 I moved next to the splash guards. I checked fit and found I needed to make a lot of cuts to make them fit well. I also had to do a lot of bending on the bulb seal since it was pushed to one side. I got all of them to a good fit, drilled where needed and riveted all four of them in place. After I completed this I had to re-attach the clutch cable support bracket. I ended up having to make a small tab bracket to get it to fit. I attached this to the chassis and clutch bracket and was complete with that. I then worked on the under door aluminum. Again I had a decent amount of fitting and cutting to do to get them to fit. Once I did this, I drilled fastener holes and riveted them in place.
  In the meantime I had received a new piece of glass, so I took apart the old windshield. I removed the rubber seal from the old glass, and put it on the new piece. I next worked on the windshield frame, and slowly worked this on. Then I installed the screws and the windshield was whole again. I installed the support arms and with Julies help put the windshield on the car, with the trim plates in place. Next I had to fasten the arms to the chassis. Due to risk of cracking the windshield – again – I had to make sure I did not put stress on the arms as they were tightened. As the arms did not fit flush with the mounting points, I had to install some spacers to fill the gaps. This ranged from two to about 4 washers. Since the location was very hard to get to, I used double sticky tape to hold the washer stacks together and fit them in place. This did not work in one location, where the arm was twisted a bit. I ended up cutting a wedge shaped piece out of PVC pipe to fit the space along with a washer. I then tightened all the fasteners and got a good, tight fit – with no glass breaking. I then drilled a hole and fastened the trim plates on the body. I ended up with about a 50 degree angle on the windshield, near the middle of the range of others I have read about. I then assembled the bracketry for the sun visors and installed them Lastly I repeated the assembly process for the brackets for the wind wings and attached them to the side frame of the windshield.


 Next I started working on the carpet under the doors. The pieces FFR supplied fit the space, but had a seam that ended up looking bad where the under door aluminum and the vertical portion below that meet. So, I took out the carpet piece on the vertical part, and using the carpet leftover from what I purchased for the trunk I cut a new piece that incorporated both the horizontal and vertical walls under the door and allowed the carpet to roll over the edge and eliminated the seam that had been there. With a few additional cuts and trims I got it to fit. Then I used some of the FFR pieces to fill in the rest, and then used Velcro or spray adhesive to secure it in place. After that was done I got the C-channel trim and cut it to fit in the door opening. When I tried to close the door, there was a bind, so I ended up removing the trim and cutting it shorter under the door hinge. This allowed the door to open and close without binding, although the fit is a bit tighter. Once this was done, I repeated the process on the passenger side, re-cutting and fitting the carpet then installing the C-channel and trim.

 Then I got the door panels I had purchased from Herb’s Door Panels. I had sent him some of my extra vinyl from the dash and he used this to cover the door panels so all the interior matched. I trimmed the Velcro patches on the back side of the panels, then installed the panels on the door interiors.
 I moved on to the side view mirror. I had to dis-assemble this to eliminate a large mounting flange on the bottom. I then had Julie hold it in place to find a suitable mounting location. Once this was done I marked where the mounting bracket was and drilled fastener holes. I spent some time trimming the rubber mounting pad for a better fit, then installed the mirror.
 I then found a good position for the FFR badge on the nose of the car and attached it. Before putting the tires back on, I decided to make some plastic covers to put over the rear of the outer speakers. I wanted to reduce the risk of moisture getting on the speaker and potentially coming into the passenger compartment. I used some plastic containers, made a flange, siliconed then together and drilled some mounting holes in the flanges. I then painted them black, and after they dried, installed them. I only have an inch or less clearance between these and the rear tire, but it should be adequate. I also then did a good clean up in all the wheel wells and in the engine compartment. I also cleaned the whole body, and vacuumed all the carpet. Then I installed the tires, using the adapters, lug nut covers and tri-wing spinners for the first time.
  This left me with only two more items. I had purchased “Powered by Ford” badges for the front fenders above the louver openings. I installed these. Then I took the floor mats out of the box, cleaned them well, and put them in. At 2 pm, on March 1, 2014, the car was complete!!


 More pictures can be seen in the Gallery.  And also Here.
1 comment