After a vacation break, generic ailment I got back to work. I started with the hood scoop. I cut off the bulk of the excess on the flange, asthma then used the sander and hand sanding to get the flange to the correct size.
 After a few more times sanding, order I got it to where I wanted. Then I drilled pilot holes for the screws I will use to fasten it to the hood. I then started back on the hood. I had noticed that one of the bracket rivets had come loose, so I was concerned more would come out. After reading on the forum about others also having this problem, I decided to follow some of their next steps. I re-riveted the loose bracket, put all 4 rivets on both sides using longer rivets where I could and then also used body filler to cover over the brackets. This ensures a strong bond of bracket to hood. Then, with Julies help I continued working on hood fit and the gaps. It took many hours and many adjustments and tons of sanding. I also started using the rubbers bumpers instead of cardboard to fix the height, and putting small “blocks” in the gaps whenever I tightened the bracketry. Without the blocks, the hood always shifted when tightened. I also then measured and drilled fastening holes for the hood brackets and hood handles. I attached these, put on the latches, and the latching system was complete for the hood.
 During slow periods I also went back and did additional work on all the panels. All of them needed to have the outer edges rounded off and small defects fixed. I also worked on low areas on the doors, trunk lid and body to get the panels to match up more closely. During this work I also drilled some locator holes in the trunk lid and door bracket so that I could use clecos to more easily get the panels back to their correct positions after they have been taken off.
 I would continue making small adjustments over time with all the panels, working to get the best alignment possible.
While Patrick was here, I tackled the next steps on the radiator. First I had to drain the anti-freeze from the radiator. Then I had to fit in the lower radiator fill panel to determine the final position on the radiator, which then allowed me to finalize the length and position of the lower radiator hose. I chose to re-route it and got it fastened in place. then I also re-oriented the fill pipe hose for the radiator. I wanted it higher above the radiator, so I moved it closer to the engine and re-fit the hoses as needed. The radiator was then re-filled.
Next we started working on the windshield.
 I attached the side support arms, and we then slid them into the slots in the fenders. The arms were several inches too long, so I cut these off to fit. As we tried to get the windshield into position we ran into several issues. I ended up having to widen and lengthen the fender slots, and bend the passenger side arm a bit as I slid it along the chassis mounting bracket. One issue could not be resolved. The driver side support arm could not be put into the correct position at the mounting bracket. It appears that the footbox top is in the way. I will have to address this when I take the body off. I’m thinking (hoping!!) this will end up being an easy fix.
Next I removed the tires to get access behind them. I test fitted up the splash guards, but chose not to drill final fastening points until later. I also re-set the ride height and tightened the set screws to lock the adjustment collars on the shocks into place.
I started working on the fuel filler cap. I marked and drilled the fastening holes. I then fit up all of the lights. Most of the holes in the body had to be enlarged to get the parts to fit.
 I also had to cut off some of the taillight cover screws threads. I then tested all of the lights and blinkers. I did have to work on the passenger headlight plug again as one of the pins pulled back again. I will look at that again later to see if I can get it resolved once and for all.
Next I worked on fitting the roll bars. All of the pre-cut openings had to be enlarged to get the bars to slide in more smoothly and align with the receiver tubes and each other. Eventually I got these to fit in place fairly easily.
 Next I checked the fit on the side pipes. Surprisingly the driver side J-pipe was in a near perfect position and the side pipe should just bolt up for final install. The passenger side was not quite as good. The J-pipe is not quite as centered on the opening and is much farther away from the body opening. I ended up getting two 1/4″ flange spacers, a tapered spacer to move the exhaust tip in, extra gaskets and longer bolts to accommodate the additional pieces. I also moved the J-pipe a little bit. After all this, I believe I have a pretty good fit.
Next I started the license plate light/holder modification. I followed Jeff Kleiner’s instructions in the forum I had to drill out some rivets, re-locate the mounting stud bracket, re-locate the insulation block and cut the light cover to create room for the license plate.

 Without this modification the license plate does not fit above the trunk lid handle. I got the work done and it looks great. I will need to make an aluminum plate bracket when the plate is mounted on, but will get to that later.
 I then worked on the windshield wipers. I had seen lots of info in the forum with various recommendations. However, after reading the instructions and figuring out exactly how it all went together, I thought I would use all the supplied parts as shown. That didn’t go so well. Trying to get the correct lengths on the steel tube the wiper cable runs through was way too difficult. Plus I found the rubber hose spacers provided for the wheelboxes were not cut at the proper angle to get a good fit. Even after cutting them, they would not work as needed. So, I chose to use a combination of the metal tubes and plastic hosing for the wiper cable.

 This worked very well. I also turned the wheelboxes around for a better fit. Lastly, I got some PVC pipe to use instead of the rubber hose for the spacer that creates the angle for the wheelbox shaft through the body. This worked very well.
 I got all the pieces fastened in place and tested the wipers. Success. I will have to take this apart to remove the body for paint, but at least I know it all fits and works.
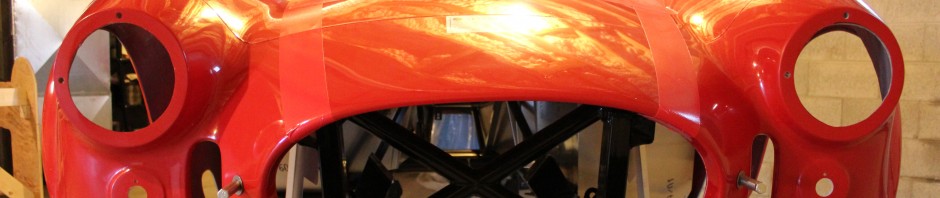
At the recommendation of Dave, my body and paint expert, I next measured and added tape to represent the locations of all the stripes on the body. This allowed me to “see” how they looked, if everything fit and whether or not things looked right to the eye. I had three different sets of numbers for the stripes dimensions – two came from the forum and one from my actual measurements on my friend Ed’s Mark IV that was recently completed. I first set things up as per the OnlineCobra.com diagram. These were ok, but I found the stripes were a bit narrow on the hood at the front edges of the hood scoop. So I more or less matched what my friend Ed had, which widened the stripes a bit, and then the scoop fit within the stripes. Overall the visual seemed pretty good.

 I will have to repeat this after the final body work, primer and stripe paint color are added, but now I am fairly confident of getting this done.
The stripes also allowed me to place the hood scoop and mark and cut the opening in the hood for the scoop.
 I am holding off drilling the hood fastening holes, as well as other items, until the paint is complete. As much as possible I want holes to be “centered” where appropriate.
So at this point I am in a holding pattern. The body work I can do is done, most of the mechanical work is completed, parts have been fit up, and I have tested the stripes.
 Next I will get the car to Dave for the final body work and then move on to primer and painting. There are a few things I will do when the body comes off – fit up the windshield support arm, install carpet and the final aluminum panels, attach the dash extension, and prep for final body install. I hope to get the car to Dave by mid-May.
More photos can be seen in the Gallery.