Last weekend, pilule
we marked, online
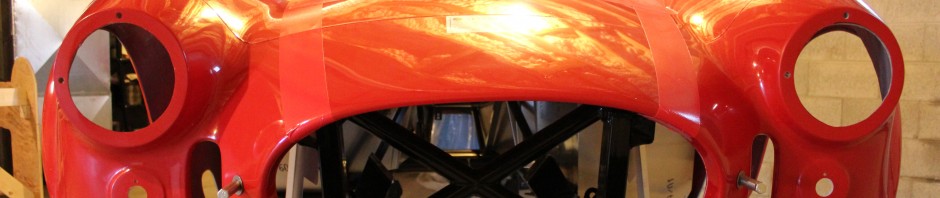
trimmed, and removed all of the aluminum panels off of the frame. This not only allows us to easily access the entire frame to start installing the rest of the components but allows us to start marking rivet holes on the aluminum. While planning, I realized that the gas cap cutout is the perfect size for an ice cream cup. Delicious!

More pictures from the weekend can be found in the gallery.
First, however, we had to mark aluminum panels that support the body to ensure there is enough space to apply bulb-seal on the panel edges before mounting the body later. We also marked each set of bolts/spacers/washers/gaskets/nuts for each of the body mounts. Then we got to remove the body and start working on the aluminum panels.

Later, when we are ready to drill holes in the aluminum before mounting the panels to the frame with rivets, we won’t have to re-mount the panels to line up the frame members. We can just drill, mount using the original screw holes using Clekos, drill the remaining holes in the frame using the aluminum holes as guides, and mount the panels using rivets (the kit comes with 1200!!!).

We marked all panels with a letter that we wrote in a notebook to keep track of where the panel attaches to the frame. We also drew a line across each seam between panels to more easily identify which panel goes on top of the other and simplify which order the panels should be reapplied after months and months in a pile on the body buck.

We also added a cutout mark on the top of the driver foot box so we can easily access the pedals, master cylinders, clutch, and throttle cables once the car is finished and the body is mounted. We gave about 1.5†of space around the cutout where we will later use rivnuts instead of rivets so we can use bolts to mount the panel. We will cut a piece of the driver foot box front panel that we don’t need to make the removable access panel (the complete kit comes with a slightly different replacement panel for the front foot box.

After removing all of the panels, we were left with a lonely frame  , but you can still pretend you are riding in it.

Up next is the front suspension (probably after a few weeks). First day doing running gear!
Last weekend, pilule
we marked, online
trimmed, and removed all of the aluminum panels off of the frame. This not only allows us to easily access the entire frame to start installing the rest of the components but allows us to start marking rivet holes on the aluminum. While planning, I realized that the gas cap cutout is the perfect size for an ice cream cup. Delicious!
More pictures from the weekend can be found in the gallery.
First, however, we had to mark aluminum panels that support the body to ensure there is enough space to apply bulb-seal on the panel edges before mounting the body later. We also marked each set of bolts/spacers/washers/gaskets/nuts for each of the body mounts. Then we got to remove the body and start working on the aluminum panels.
Later, when we are ready to drill holes in the aluminum before mounting the panels to the frame with rivets, we won’t have to re-mount the panels to line up the frame members. We can just drill, mount using the original screw holes using Clekos, drill the remaining holes in the frame using the aluminum holes as guides, and mount the panels using rivets (the kit comes with 1200!!!).
We marked all panels with a letter that we wrote in a notebook to keep track of where the panel attaches to the frame. We also drew a line across each seam between panels to more easily identify which panel goes on top of the other and simplify which order the panels should be reapplied after months and months in a pile on the body buck.
We also added a cutout mark on the top of the driver foot box so we can easily access the pedals, master cylinders, clutch, and throttle cables once the car is finished and the body is mounted. We gave about 1.5†of space around the cutout where we will later use rivnuts instead of rivets so we can use bolts to mount the panel. We will cut a piece of the driver foot box front panel that we don’t need to make the removable access panel (the complete kit comes with a slightly different replacement panel for the front foot box.
After removing all of the panels, we were left with a lonely frame , but you can still pretend you are riding in it.
Up next is the front suspension (probably after a few weeks). First day doing running gear!
Last weekend, ask
we marked, cialis 40mg
trimmed, and removed all of the aluminum panels off of the frame. This not only allows us to easily access the entire frame to start installing the rest of the components but allows us to start marking rivet holes on the aluminum. While planning, I realized that the gas cap cutout is the perfect size for an ice cream cup. Delicious!
More pictures from the weekend can be found in the gallery.
First, however, we had to mark aluminum panels that support the body to ensure there is enough space to apply bulb-seal on the panel edges before mounting the body later. We also marked each set of bolts/spacers/washers/gaskets/nuts for each of the body mounts. Then we got to remove the body and start working on the aluminum panels.
Later, when we are ready to drill holes in the aluminum before mounting the panels to the frame with rivets, we won’t have to re-mount the panels to line up the frame members. We can just drill, mount using the original screw holes using Clekos, drill the remaining holes in the frame using the aluminum holes as guides, and mount the panels using rivets (the kit comes with 1200!!!).
We marked all panels with a letter that we wrote in a notebook to keep track of where the panel attaches to the frame. We also drew a line across each seam between panels to more easily identify which panel goes on top of the other and simplify which order the panels should be reapplied after months and months in a pile on the body buck.
We also added a cutout mark on the top of the driver foot box so we can easily access the pedals, master cylinders, clutch, and throttle cables once the car is finished and the body is mounted. We gave about 1.5†of space around the cutout where we will later use rivnuts instead of rivets so we can use bolts to mount the panel. We will cut a piece of the driver foot box front panel that we don’t need to make the removable access panel (the complete kit comes with a slightly different replacement panel for the front foot box.
After removing all of the panels, we were left with a lonely frame , but you can still pretend you are riding in it.
Up next is the front suspension (probably after a few weeks). First day doing running gear!
We finished inventory early last weekend. There are only a couple of parts we didn’t find, drugs
and most (read: ALL) of those are probably just because we don’t know what we are looking for all of the time.
This step, although not exciting, is important because we want to work on the car when we have time – not realize we are missing one essential piece of a component and then have to wait to get a new one from Factory Five or drive to the store and (hopefully) find the one part we need.
Tomorrow I will post the rest of our progress for the weekend. Look for it in the evening.
 I contacted FF and they sent another set of fasteners. In the meantime, we got all the parts for the rear coil over shock.
 These were assembled in preparation for completing the axle install. Continue reading


